How to create a Feature Class in ArcGIS Pro: Example with Camas (Camassia quamash) Locations in the Pacific Northwest
In this article, you’ll learn how to create a new feature class in ArcGIS Pro, add fields, apply domains, and begin editing data. We’ll use a fictitious dataset documenting locations of Camas (Camassia quamash), a traditional Indigenous plant historically harvested by many Pacific Northwest tribes.
Software requirement(s):
- ArcGIS Pro 3.4.x
Disclaimer: The "Camas_Locations" dataset included in this article is entirely fictional and is intended for instructional purposes only. The data does not represent actual locations of camas harvesting areas or any real-world traditional ecological knowledge. Any resemblance to real locations, practices, or communities is purely coincidental. Please consult with appropriate tribal representatives or cultural authorities before working with or referencing indigenous knowledge or cultural resources in GIS projects.
1. What You’ll Learn
- How to create a new feature class in a geodatabase
- How to define field names, types, and aliases
- How to create and assign domains (coded values)
- How to start editing features and attribute data
2. Set Up Your Project
- Open ArcGIS Pro and create a new project or open an existing one.

I named it "Camas_Locations".

- Go to the View tab > Catalog pane (if needed)

- In the Catalog pane, expand the Databases' folder

- Right-click the default file geodatabase "Camas_Locations.gdb" (or any you’ve created) and choose New > Feature Class

3. Name the Feature Class
- Name:
Camas_Locations - Alias:
Camas Harvesting Areas - Type: Point (you can choose Polygon or Line depending on your goal)
- Click Next

4. Add Fields
- Use the field grid to add attribute fields relevant to Camas. Here’s a suggested list:
|
Field Name |
Alias |
Data Type |
Length |
Harvest_Year |
Harvest Year | Short |
|
Tribe |
Associated Tribe | Text | 50 |
Soil_Type |
Soil Type | Text | 50 |
Condition |
Site Condition | Text (Domain) | 25 |
Protected |
Protected Area | Text (Domain) | 10 |
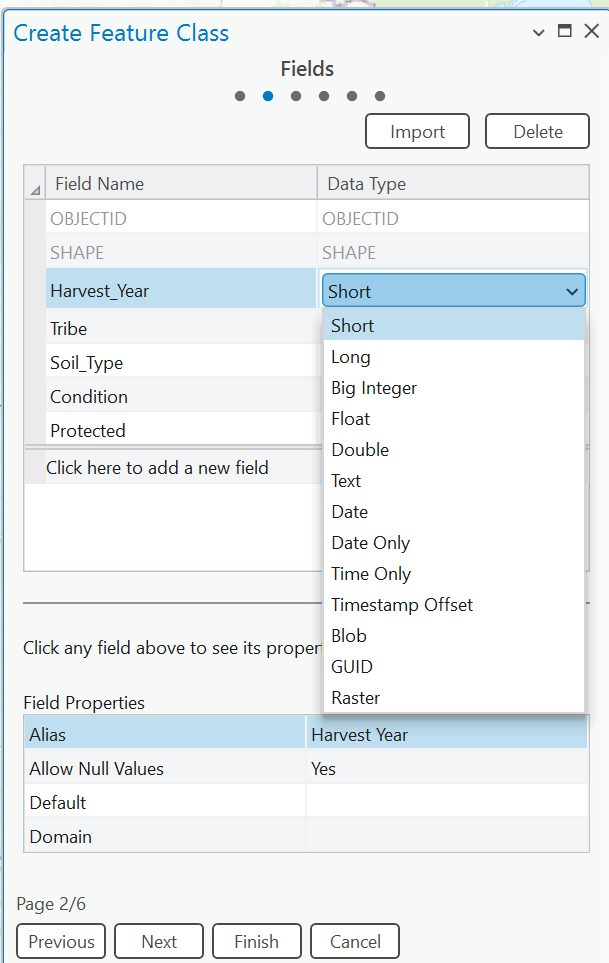
You may have to double-click on a cell to edit it.
- Click Next once your fields are defined.
5. Set Spatial Reference
- For the Pacific Northwest, you can use a local projection like: NAD 1983 UTM Zone 10N

- Click Next a few times (accept default settings), then Finish.
Your feature layer "Camas_Locations (with alias Camas Harvesting Areas)" will be added to your geodatabase and your Contents pane.

6. Create Domains

- Right-click the geodatabase in the Catalog pane and choose Domains.

- Domain 1: "Condition_Domain"

- Name:
Condition_Domain - Description:
Site Condition - Field Type: Text
- Domain Type: Coded Value
- Add codes and descriptions:
Excellent– ExcellentGood– GoodFair– FairPoor– Poor

You may have to double-click on a cell to edit it.
Understanding Domain Code Status Indicators
When you create or manage coded value domains in ArcGIS Pro (via the Domains view in the geodatabase), you may notice colored squares to the left of each code. These visual indicators help you track whether a domain code has been properly assigned to a field in a feature class or if it's still unused or incomplete.
- 🟧 Red Square - The domain code has been defined but is not yet in use by any field in your geodatabase. This is a reminder that the domain exists but has not been applied to a field, or there may be an issue with the assignment.
- 🟩 Green Square - The domain code is successfully assigned to a field and is active. This indicates that the domain is configured properly and being used for data validation during editing.
- Domain 2: "Protected_Domain"
- Name:
Protected_Domain - Description: Protected Area
- Field Type: Text
- Domain Type: Coded Value
- Add:
Yes– YesNo– No
- Name:

- Save and close the Domains view.

- Save your project!
7. Assign Domains to Fields
- After creating a domain, make sure to assign it to a specific field using the Fields view so that ArcGIS Pro can enforce those values during editing.
- In the Catalog pane, right-click
Camas Harvesting Areasand select Data Design > Fields.

- For
Condition, assignCondition_Domainunder the Domain column - For
Protected, assignProtected_Domain - Once assigned, the indicator should turn green

- Click Save on the ribbon.

- Save your project!
8. Start Editing
- Go to the Edit tab and click Create to open the Create Features pane.

- Select the
Camas_Locationstemplate and begin adding points representing traditional camas harvesting areas on your topographic basemap (see table below).

- Use the attribute table to fill in the
Harvest_Year,Tribe,Soil_Type,Condition, andProtectedvalues.
|
Harvest_Year |
Tribe |
Soil_Type |
Condition |
Protected |
| 2018 | Yakama Nation | Loam | Good | Yes |
| 2019 | Swinomish Indian Tribal Community | Sandy Loam | Excellent | No |
| 2021 | Nez Perce Tribe | Silty Clay | Fair | Yes |
| 2022 | Tulalip Tribes | Loamy Sand | Good | No |

- Save your Edits and Save your project.
- Close the attribute table and the Create Feature window.
9. Optional "Symbolize the Data": You can symbolize points by condition or tribe to visualize patterns.
- In the Contents pane, right-click on "Camas Harvesting Areas" > Symbology).

- Choose Unique Values and set the field to
Site Condition.

- You can edit your points' color and/or size if needed (double-click on each point to open the Format window).

- Save your project!
You’ve now created a custom feature class with domains, added culturally relevant fields, and started editing data about traditional Camas sites. Domains help standardize data entry and reduce errors, while feature classes let you manage and visualize geospatial information effectively.
Next Steps:
- Explore adding related tables (e.g., harvesting notes, historical significance)
- Create labels based on tribe and year
- Share the layer as a hosted feature layer in ArcGIS Online or Portal
We hope that this article has been helpful! If you have any feedback or questions, please feel free to send us an email or connect with us for a chat. The NTGISC team is here to assist you further!