Migrating to ArcGIS Pro: The Catalog Pane (Portal section)
One of the most significant improvements in ArcGIS Pro is the Catalog pane, which centralizes access to all your GIS data and resources—including content from your organization’s ArcGIS Online or ArcGIS Enterprise portal. In this article, you’ll learn how to navigate the Portal section in the Catalog pane to find and add web content to your ArcGIS Pro project.
Software requirement(s):
- ArcGIS Pro 3.4.x
- ArcGIS Online
1. What is the Portal Section in ArcGIS Pro?
In ArcGIS Pro, the Portal section of the Catalog pane allows you to connect to and browse content from:
- Your Content (items you own)
- Your Favorites (favorite content)
- Groups (groups you belong to)
- My Organization (content shared within your organization)
- ArcGIS Online (public web layers and services)
- Living Atlas (ready-to-use authoritative content from Esri and partners)

This is a major shift from ArcMap, where accessing online content often involved using Add Data > Add Data From ArcGIS Online or adding servers manually.
2. Accessing the Portal Section
Step 1: Open the Catalog Pane
- Go to the View tab on the ribbon.
- Click Catalog Pane to open it on the side of your interface.

Step 2: Switch to Portal View
- At the top of the Catalog pane, click the Portal tab (next to Project, Favorites, etc.).

3. Navigating Portal Tabs
You will now see six key tabs under the Portal section:

|
Tab |
Description |
| My Content | Items you personally own on the portal. |
| My Favorites | Your favorite content. |
| My Groups | Content from groups you are a member of. |
| My Organization | All items shared within your ArcGIS Online or Enterprise org. |
| ArcGIS Online | Publicly shared layers, maps, and tools from other users. |
| Living Atlas | Curated content from Esri’s Living Atlas of the World. |
Click each tab to explore the content available under that category. You can search by keywords or browse folders and tags.
4. Adding Portal Items to Your Map
To add a portal item (like a feature layer or web map) to your map:
-
Search for the item in the appropriate portal tab (e.g., searching for the "National Land Cover" in the Living Atlas tab.
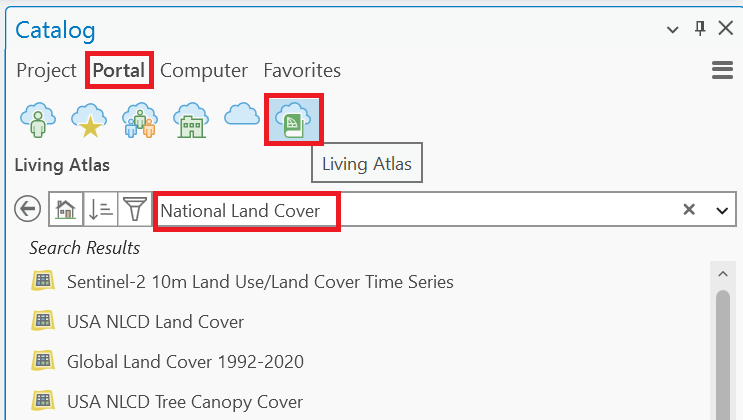
- Right-click the item and choose Add To Current Map or Add To New Map.


- The item will be added just like a local layer, but it will remain hosted in the cloud.
Sometimes, you can also drag and drop items directly into the Contents pane or Data View.
5. Signing In to Your Portal
If you’re not seeing any content:
- Make sure you're signed in to your ArcGIS Online or Enterprise account.
- Go to the Project tab > Portals to manage your active portal connection.
- Right-click a portal and choose Set As Active Portal to switch.
- You can also add a new Portal if needed.

Best Practices and Notes
- Manage Portal Connections: You can have multiple portals listed but only one active at a time.
- Stay Organized: Use tags, folders, and consistent naming when uploading data to the portal.
The Portal section of the Catalog pane in ArcGIS Pro replaces the older methods of accessing online content in ArcMap with a more integrated, intuitive experience. Once you become familiar with the portal tabs, searching for, adding, and managing web content becomes seamless—whether you're pulling from your organization's resources, your own hosted layers, or public data from across the web
We hope that this article has been helpful! If you have any feedback or questions, please feel free to send us an email or connect with us for a chat. The NTGISC team is here to assist you further!