How to convert Degrees Minutes Seconds to Decimal Degrees with Excel and import your .csv file in ArcGIS Pro
Occasionally, during fieldwork, GPS coordinates are mistakenly set in degrees, minutes, and seconds (DMS) instead of decimal degrees (DD). This can pose challenges for GIS software due to the presence of special characters in the DMS notation.
You probably recall some of the fundamental rules when selecting names for files and folders in GIS: avoiding spaces and special characters while permitting underscores for improved readability and compatibility across different software platforms. These guidelines also extend to the formatting of coordinates.
Scenario: You are diving into the impact of sea level rise on indigenous communities and need to map their locations. Your colleague hands you a spreadsheet packed with their whereabouts, complete with latitude and longitude coordinates. But there is a hitch: the coordinates are in DMS format. Time to convert them to DD so they can be imported into ArcGIS Pro.
Software requirements:
- Excel
- ArcGIS Pro 3.2.x
1 - Download the Excel spreadsheet by following this link https://tribalgis-my.sharepoint.com/:x:/p/sarques/EYe9WWhLbhlEmV3kPN3PjeYB4TMtvQWrmhJMkwmF5Ya0hA?e=Qqg8EW
2 - Save your file in a meaningful location, open it and analyze its content. As you can see you do have a lot of special characters in it.

The confusion between X and Y is a common pitfall in spatial data interpretation. It is crucial to clarify that X typically denotes the longitudinal coordinate, representing east-west positions on the Earth's surface. Conversely, Y correspond to the latitudinal coordinate, indicating north-south positions. Just remember: X is longitude, and Y is latitude. Write it somewhere!
3 - First, you need to separate the DMS values into individual columns for degrees, minutes, and seconds using the Text to Columns function in Excel.

4 - Select the column containing the text that you want to split. We selected the longitude column first.

5 - Go to the 'Data" tab and in the "Data Tools' group click on the Text to Columns.

6 - In the Convert Text to Columns Wizard choose Fixed width and click Next.

7 - Separate your DMS values (and special characters) into individual columns and click Next.

8 - And click Finish.

9 - You can see that your values have been separated into Degrees, Minutes, and Seconds.

10 - Rename your columns D, M, S, and delete the fields that are not needed.

11 - We'll use the formula below to convert DMS to DD:
Decimal Degrees = Degrees + (Minutes / 60) + (Seconds / 3600)


12 - Autofill this formula for the other cells.

13 - Rename your field 'Longitude', copy your column and paste as 'Values.'


14 - Delete the other fields.


Make sure to add the minus sign in front of your longitudes as our locations are located West of the Prime Meridien.
15 - First add -1 in one of the cells. Right-click and Copy -1.

16 - Select your longitude column (the column field name Longitude included).

17 - Right-click, select Paste Special then Multiply. Select OK.

18 - You can delete -1 when you are finished.

If you try to add the minus sign in front of your numbers without following these steps, the software will try to display a formula.
19 - Repeat the steps for the latitude (Y). Minus the minus! Except if you have locations south of the Equator.

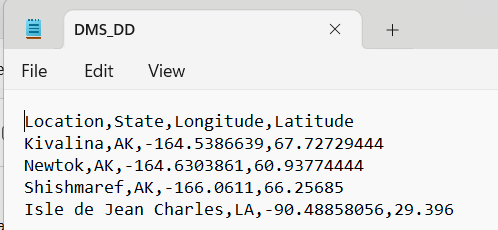
20 - Save your worksheet as a .csv file. We saved it under DMS_DD.csv

An Excel worksheet and a CSV (Comma Separated Values) file are both commonly used for storing tabular data, but they differ in their file formats and functionality. A CSV file is a plain text file where each line represents a row of data, with values separated by commas or other delimiters. CSV files are lightweight, easy to create and read, and widely compatible with different software applications.
21 - Open ArcGIS Pro and create a New Map Project. We named ours 'DMS_DD'.
22 - Open your Catalog pane (View tab), and make a folder connection to the folder where you saved DMS_DD.csv
23 - Right-click on your DMS_DD.csv, select Export then Table to Point Feature Class.

24 - In the XY Table to Point Geoprocessing window populate the different parameters. We chose the GCS_North_American_1983_HARN as our Geographic Coordinate System because our locations are in North America.

When working with coordinates in GIS, it is very important to ensure that your dataset is set to a geographic coordinate system first (GCS), such as WGS84 or NAD83. Once your dataset is in a GCS, you can project it if needed using the Project tool.
25 - Click Run.
26 - Celebrate your success!!!!
